Phresh Blazer for Girls ~ A Winter Wear Designs Pattern ~ Pattern Review

0 comments
I was so excited that I was able to be a part of the Bundle Up reviews this time around because it is full of wonderful beautiful MUST HAVE patterns!!! All of the patterns will be wonderful additions to your growing collection but the one that you just HAVE to HAVE (of course there is no way you will be able to just choose one!) is going to be the Phresh Blazer by Winter Wear Designs! Suzzane has really knocked it out of the park with this little beauty!!! 


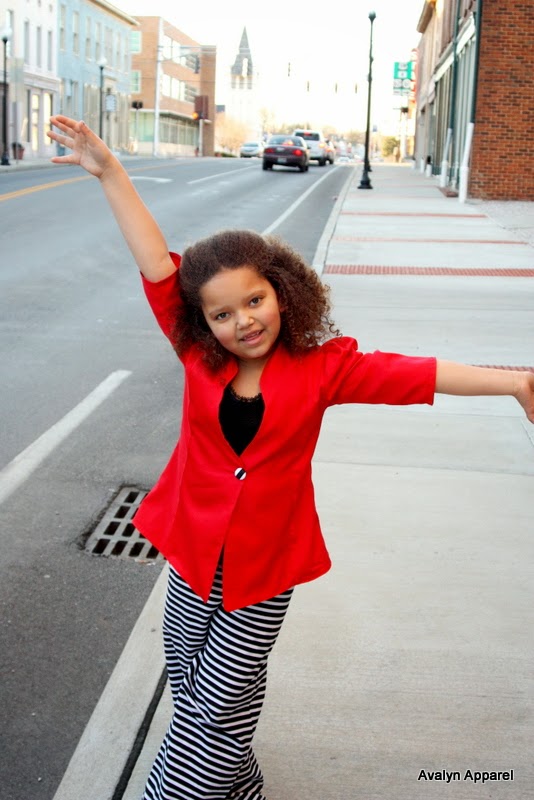
The Phresh Blazer is perfect for SOOOOO many reasons as you will soon find out but I am going to start out with saying that my little loved this so much that even after an extremely long day she was ecstatic to hit the town and model this beauty!


There are many options that you will be able to pick and choose from when making the blazer. You have the ability to either sew this up with long sleeves or 3/4 sleeves and the option on the sleeves for them to be straight or to be gathered depending on the look that you want. You can also add the 3 rows of ruffles on the back as I did or you can go without the ruffles. Another cute detail on this blazer is the option to add a welt pocket which I opted out of on this blazer. So many looks in just one pattern!!! In addition to having lots of different options, the Phresh Blazer goes from a size 1 to a size 14 so it will be one that you will be able to use time and time again!


The instructions are very organized, detailed and easy to follow and understand. There is great information regarding the pattern as well as general information on how to get the best fit for your child. The pages are numbered and there is just such a neat appearance of this pattern it is a joy to actually construct. I know I have had issues with other patterns I have come across that use cutsie fonts and they could be a little on the wordy side which in my opinion really can get annoying. Not this one! Suzanne is amazing when it comes to the flow and ease of her instructions!


The fit on this was spot on! This pattern is recommended for fabrics with stretch but it can be made with fabrics that do not have stretch. I chose to use a beautiful red woven cotton that had very little stretch. Since I know that my little likes nothing tight anywhere on her body (seriously....even her swimsuits have to be loose!!!) I just went up a size to compensate for the fabric not having much stretch. Easy as pie!!!


I love the tailored look of this piece! When I first saw this I figured that there would be so much time and effort that was going to have to go into it to get such a professional looking end result and that it would be a pattern for advanced sewists. I was wrong!!! I would highly recommend even beginners to give this Phresh Blazer a try!! 


In addition to amazingly well written instructions, the pattern pieces fit together like a dream! Everything matched up perfectly and it went together quickly and easily! There is also a key on page 4 to help guide you to make sure the pattern pieces are placed properly when taping together!


So, lets just review one more time how amazingly awesome this pattern is! Great fit, check! Well written, detailed and easy to understand instructions, check! Enough options to be worth your money, check!! A great size range, check! Pattern pieces that fit together like they are supposed to, check!


In closing.....everything about the Phresh Blazers amazing! It is a must have and one that your little is going to love! Dress it up, dress it down....it doesn't matter how you dress it, it is just amazing!


XOXOXOXOXO
~Rebecca~

Treasured ~ a Lilac Lane Pattern ~ Pattern Review

0 comments
I am a huge fan of anything classic looking....don't get me wrong...me and the littles also like trendy.....but I'm loving the fact that the classic look is now becoming more "trendy" than it has been in the past few years.


When I saw Treasured by Lilac Lane I fell in love with the classic whimsical look of this dress.....and I knew it was one that had so many possibilities in what one could create with one simple pattern. The pattern details this dress as one that is perfect for weddings, first communions or baptisms...but it is also perfect for a shabby chic look if you need something a little less formal but you are still wanting that major WOW factor!!!


The pattern is a whopping 147 pages...but do not let this discourage you!! Just make sure to print just the size you are needing so you don't end up using up all of that precious ink (you can find printing size information on page 14 of the instructions)!!! The actual instructions on this pattern start on page 4 and go through page 9 with only 26 steps to create this amazing dress!!! There are a few rectangle pieces for the ruffles and for the sash and the measurements for those are given on page 4.


The fit of this dress is perfect! I fell in love with the drop waist and it fell perfectly on my little! Not too low so that it would hit her hip area in an odd way, but low enough to give the bodice an elongated look which clearly sets this dress apart from so many others! The bodice also gives you plenty of room of you want to add your own unique touch....maybe a row of buttons or a ruffle or two down the the front...I left ours plain as we had enough going on with the prints....but once again...the possibilities are endless ladies!!! There was also plenty of room in the armpit area but it wasn't so big that it would gape open and let those girly bits show from the side....we are a "no girly bit showing household" so this was perfect!!! This pattern also goes from a size 2T to a 12 so it's great for matching sister dresses or one to grown with your little through time.


I loved the double skirt...I also loved the fact that it had shape to it so that there was flow as opposed to it being just rectangular. The ruffles are generous so if you are looking for a not so ruffely look just take some length off like I did! I also wanted my bottom skirt to show a little more so I did a couple pin tucks on the side to show of the stripes that I had used in the bodice. That too is an easy modification. Or you can also do what the instructions say and just make the a size smaller in the length of the top skirt if you would like to show off more of the bottom skirt.


The pattern went together very easily and I have to say that I absolutely LOVE the grid background on the pattern....everything lines up so perfectly and I believe that this is the first pattern that I have ever put together that does a grid background! I truly love that touch. All of the pattern pieces are labeled with what they are, the size and the name of the pattern which is nice if you are anything like me and have a million pattern pieces scattered around for a million different patterns.


So far this pattern offers a unique look that is truly one of a kind. It has a great fit.....it has a large size range...and who hoo....a pattern on a grid for such an ease for taping together!!!


This pattern is listed for an intermediate level sewist.  The instructions brief and to the point and if you are a beginner sewist might seem intimidating or possibly confusing. There are detailed pictures throughout the pattern so if you are a beginner and feeling adventurous give this pattern a whirl and you might just be surprised at your outcome.


I love this pattern....I think I might have said that a time or two, but i seriously do! I love the fact that if we have something fancy schmancy to go to I can make a killer fancy dress....and if we want a unique look I can make a killer unique dress....and if I want a shabby chic look I can make a killer shabby dress....can you see where I am going with this! 


I love patterns that are not the same as a million other patterns and this one fits that bill!!! I love the way this dress turned out and what I love even more is the fact that my little loves it as much as I do!!!!


Happy Tuesday!!!

~Rebecca~
XOXOXOXOXO


Beach To School Bottoms ~The Plucky Butterfly Designs~ Pattern Review

0 comments
The best kind of patterns that are available are the ones that you can use over and over and over again....the ones that have many different options and styles....the ones that are your go to patterns...the staples to your little's wardrobe....and the Beach to School Bottoms by The Plucky Butterfly Designs.

For my review I chose to do the relaxed pant length with the flounce...I wanted something a little different than the ruffles for this pair....but the next pair I make...which there will be MANY more in our future we are going to add ruffles!!! 


This pattern can be used year round...hence the name Beach to School Bottoms...you can make these in shorty short length, short length, capri length and pant length....see....it really is year round!!!! They also go from a doll size all the way up to a size 12 so not only can this patter be used year round...it can be used year after year after year!

The pattern has a wonderful fit overall...great length...great waist...great room in the bum...just perfect fit all the way around!


The pattern is very well written and includes lots of information from tips and tricks to techniques to a little silliness.... There are tables for the child's measurements, fabric requirements for each of the different styles and a table for cutting ruffles for each size. Everything in this pattern is easy to find and logically placed within the pattern.


Another must have...especially for patterns with lots of sizes....is a table that tells you which pages to print for the size you are needing...and this pattern includes that! Yay for saving my paper and my ink!!


The instructions have great detailed pictures that will help guide you to make the perfect bottoms....I find this to be very helpful for new sewists....or even for those experienced sewists that look at the pictures as opposed to reading through all of the instructions....and I know I am not the ONLY one that does that!!!!


This was my first pattern that I have used by The Plucky Butterfly Designs and I really enjoyed it! The fit was wonderful, the size options vast so it can be used for many years (because lets face it, the styles in this pattern are not going to be going out of style anytime soon), the instructions are great for a beginner who has never sewn with knits or to the experienced sewist, and these things can literally be made in 30 minutes tops! I was able to tape up the pattern, get my fabric cut, and get them sewn together in less than 30 minutes! Hands down that is just one of my favorite things about this pattern.....you know you love those quick sews just as much as I do!!!


So with that....I have no idea what you are waiting for to go grab this pattern! You can sew up some shorts for the beach...the gym...for under skirts and dress...sew up some longer shorts and pair them up with some tights and boots for the winter...make some capris and then go ahead and make a few pair of pant length for the heck of it!!!

Happy Wednesday!!!

XOXOXOXOXOXO 
~Rebecca~


Flutterby Romper ~Little Kiwis Closet~ Pattern Review

0 comments
I had the pleasure of doing a review of the Flutterby Romper by Little Kiwis Closet and let me just tell you how much my little LOVED it!!!! She has deemed it her "Elvis Outfit"......hey...it's her world...I'm just living in it! 


This was my first pattern that I had the opportunity to sew up by little Kiwis Closet and I'm pretty sure that it is not going to be my last! 

Now.....if you do decide to go out and buy this pattern...which I strongly suggest that you do because it is just fabulous....DO NOT print the entire pattern like I did.....I have a bad habit of just downloading and hitting print....I quickly learned my lesson to glance through the instructions now before hitting that print button! 


Because there are a TON of options with this pattern there are lots of pages...but have no fear....on page 3 of the instructions it tells you which pages to print for the options you are wanting....and again...there are LOTS of options!!! 


This romper can be made in long sleeve, 3/4 sleeve, short sleeve, and flutter sleeves. It can be made in shorts length, wide leg pants with elastic at the cuff, wide leg pants with a traditional hem or you can do tapered pants with a traditional hem...can you begin to imagine how many new outfits you can add to your littles wardrobe with so many different looks with just one single pattern?!?!!? 


Not only can you create so many different looks with just one pattern....this pattern goes from a size newborn to a size 12! Woo hoo...another pattern that will last through the years...and if you have two or more littles you can even do matching sister sets without having to buy more than one pattern to cover all of the sizes that you are needing! Bonus for those thrifty frugal mamas!!!


I chose to do the wide leg romper because well...I just love the wide leg look....and apparently so does the little! At first I was going to do the long sleeve option because...well...because it's freaking cold here in Kentucky!!! But then after looking at the options I wanted to make my little's a little different....So I chose to make mine sleeveless so that we could wear it year round. I just left out the elastic and added a casing to the front and the back of the romper. Simple alteration and it adds another option for a pattern that already has tons of options!


The pattern was easy to tape together and everything lined up perfectly. The fit was wonderful...again...I LOVE the wide leg option!!! And the construction of the pattern was easy to follow and I have to add that I loved the way that the bodice and the bottom portion of the garment are two totally separate pieces.....it gives the romper a more professional look as well as a phenomenal fit!


This pattern is very well written, easy to follow, and is very appropriate for beginners through experienced sewists! The possibilities are truly endless with this romper! 


I know that you are going to love this one just as much as we did! And how could you not....it is just the sweetest thing but can also be made so very fashionably even for the littles that are a little more vocal on their choice of wardrobe like mine is!

Happy Friday!!!

~Rebecca~
XOXOXOXOXO

The Best Friends Dress ~ Ellie Inspired ~ Pattern Review

0 comments
When I first saw the Best Friends Dress I knew that it was one that I really wanted to add to my collection of a gazillion patterns....it's a dress (or tunic) that is such a simple piece but is a must have for every single girl out there!!! And guess what?!?!?! There is a woman's version too....how great is that???? Although I ran out of time to whip one up for myself and for my biggest little, I soon will be doing that..... and of course I will HAVE to post pictures of the Mommy and me matching dresses...for the first time EVER my two littles and myself will be able to match!


There are SO many wonderful things about this pattern....and why wouldn't there be?!?!?!? It's by Ellie Inspired whom I absolutely love and one of those reasons is the wide size range that she offers! This pattern ranges in sizes from 1-16 and is a style that will look AMAZING on all of the sizes! 

I love the simplicity of this dress which can also be made in a tunic length. It's simple yet has so much style..you can dress it up...dress it down...wear it with leggings and boots and a long sleeve shirt or wear it with sandals or flats when the weather warms up!


Speaking of warming up...my poor little was FA-REEEEEEZING during this shoot....who would have thought we would get down into the 20's at the beginning of November!?!?!? She was a trooper though.

The fit on the Best Friends Dress is spot on...but if your little is like mine and is particular on where and how they want their clothing to fit, this one is very easy to shorten or lengthen to suit your Diva's needs!


The dolmen sleeves make it very easy to layer for warmth....OR you can just stick a jean jacket over the dress for a spunky look....whatever your desired look you are sure to get it with this dress!

The pattern is well written but I would rate this pattern at an advanced beginner. Not because it is difficult but because the written instructions do not add a lot of extra information...they are straight forward and to the point which is wonderful for those no nonsense sewists! 


The instructions have all of the basics that I look for...pages are numbered....there is a fabric requirement chart and a chart with finished measurements...easy to follow step by step instructions with illustrations (I have to admit that I do prefer photos as opposed to illustrations but that's just my personal preference)...the pattern pieces were easy to tape together, fit together like a dream, and were numbered and labeled....

The instructions also include two different methods for the elastic waist, you can make casings for actual elastic or you can shirr the waist. I chose to shirr the waist for the simple fact that 1. it is fast and easy....and 2. it seems the fit is better when something is shirred on my little....she's not a fan of anything tight on any part of her body!


Another option for this dress is that you can use either woven fabrics or knits....say what?!?!?! Yup....just another look you can get from just this one pattern! We chose the woven as I am on a mission to use every single piece of fabric I own until I buy more pretties....who thinks I will be able to do that?!?!?!

And did I mention that this is a FAST sew?!?! And when I say fast I mean it took me less than an hour from taping the pattern to sewing on the button! Serious!!! 


I can tell you that this dress is going to be a staple for year round wear in our household for both of my littles....they both really loved the dress and I can't wait to make more!!! 

I can't say enough good things about this pattern...if you haven't bought it yet go NOW and get it...and if you did buy it but have yet to sew it....get to it! It'll only take about an hour of your time and you will be thrilled with the finished product!!!

Happy Thursday from us to You!!!

~Rebecca~
XOXOXOXO

The Triple Layered Cake Tunic ~Candy Castle Patterns~ Pattern Review

0 comments
I have to admit that my littlest little is about out of the ruffle stage....she says they are too "babyish" for her....but when I saw the Triple Layered Cake Tunic pattern by Candy Castle Patterns I HAD to make it for her!!!! And I am so glad that I did!!!


One of the first things that I look at when pattern shopping is the versatility of the garment....how long will it be able to be worn for...can I dress it up or dress it down....can I make each one look different? This pattern checked off all of my "must haves" in a pattern. I love anything that we can wear year round and this can definitely be worn the entire year...wear it alone...wear it with a sweater over it...wear it with a long sleeve shirt underneath...you can even use seasonal fabrics for the perfect holiday outfit!


The length of the tunic is PERFECT! If you wanted to get really crafty and if you are feeling a tad bit on the adventurous side, you could even lengthen the ruffles and make a dress instead of a tunic!


The ruffles have the perfect fullness.....I have noticed that sometimes when creating something with ruffles there is too much fabric which causes the piece to be too heavy which causes it to pull the bodice down when being worn. The ruffles on this tunic stand out perfectly.


The bodice has beautiful coverage. I love that it is fuller coverage. When wearing this with nothing underneath it you won't have to worry about seeing any girly parts poking out. I am a pretty modest mamma with what my littles wear, so bodice coverage is always a concern of mine. No worries with this one!


The written instructions for this pattern are spot on! They are very well written which is perfect for the beginner sewist but an experienced sewist will also enjoy this pattern because there is not TOO much detail that you have to scan over...just the right amount of information to create the perfect addition to your little's closet!


The pictures throughout the instructions are also very clear and easy to decipher what is being depicted. The instructions include charts for size and cutting the ruffle pieces in both inches and centimeters which is a wonderful addition.


The overall fit of the tunic was spot on!!! I have used two different patterns from Candy Castle and I have found that they both fit beautifully...no need to alter...pick your size and be confident knowing that it is going to fit!!!


There were a few changes that I made but only for personal preference. I prefer buttons over snaps so we used some cute little brown buttons on the back of the dress. If I were making smaller sizes I would more than likely use snaps just for the ease of the off and on with squirmy little ones...but since my little is not so little anymore I chose to use buttons. We are also not HUGE fans of big bows so I shortened the length of the tie at the waist and tied it in a cute little knot on the front of the dress....once again, these are just our preferences...the tunic looks super cute either way!!


In closing....GO GET THIS PATTERN!!! It is adorable!!! Sew a "cake" that your little one will look cute enough in to eat!!! Our flavor of cake was blueberry with raspberry swirl....oh so yummy!!!! 


You can not go wrong with this pattern that can be worn year round, that is perfect for any level of sewist, that is written wonderfully, and that fits like a dream!!!


Happy Thursday!!!!

XOXOXOXOXO
~Rebecca~